Create a folder
Description
If you have administrator rights, you can create a folder and subfolder structure in the desktop to store your work, sessions, files, etc. there.
Details
Practically all content on easydoo is stored in folders. A meaningful folder structure helps you to find the content faster and to grant access rights to others.
The following contents find their place in the folders:

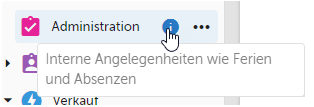
To create a folder, choose a name for the folder, a matching icon and a color. So that your colleagues know what purpose this folder serves, or what content it is intended for, you can define a purpose. This will then be visible when you drive over the info icon next to the folder.
After you have created a folder, we recommend that you share it immediately with the desired people (see «Share folder»).
Step-by-step instructions
- In the main menu, switch to the menu item «File» (see 1 in Fig. 1).
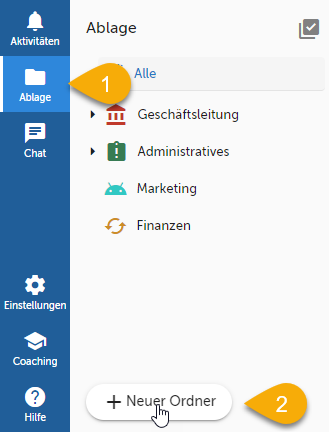
Fig. 1 - Create a new folder
- Create a new folder by clicking on «New folder» (see 2 in Fig. 1).
- Enter a name for the new folder («Marketing», see 1 in Fig. 2).
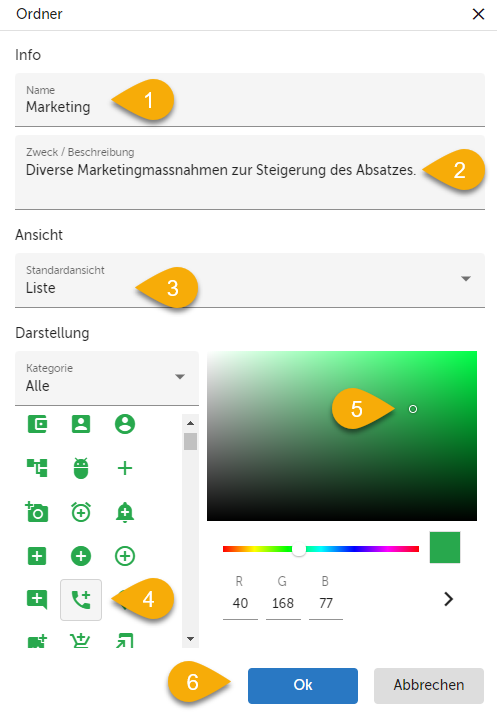
Fig. 2 - Entering a new folder in the dialog
- Next, you define the purpose or description of the folder («Various marketing measures to increase sales. », see 2 in Fig. 2). The purpose is displayed when you drive over the folder and the info icon after creating it.
- Select the form in which the work items in the folder should be displayed by default (see 3 in Fig. 2). This setting applies to all users who have access to this folder. If you select the list view, then the work items are displayed as a list under «Work» or you choose the board view as in our example.
- If you select the board view, you have to define which work item type easydoo should display to you by default (e.g. «Task», see Fig. 3). By default, tasks on the board are always displayed sorted by status when you view the work in this folder.
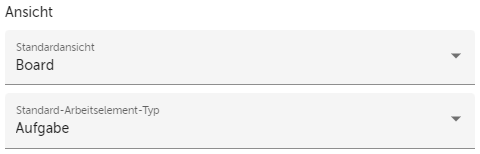
Fig. 3 - Settings of the standard view in the board view scenario
- Now you can select the icon for the folder and the appropriate color in the Left section under «Display» (see 4 and 5 in Fig. 2).
- Click on «OK» to create the folder (see 6 in Fig. 2). After that, the new folder appears on the left side of the cabinet
- Share the folder with the desired people and teams.
- After you have shared the folder, you can only create subfolders.
Tips
If you define the teams first, you can grant the right access rights for the corresponding teams as soon as you create them. Then you don't have to do it afterwards.
Reprimands
Customer support service by UserEcho